Keep your dog’s nails short for the health of your dog


Nail Grinding Instructions
Tools Needed to grind your dog's nails.
-
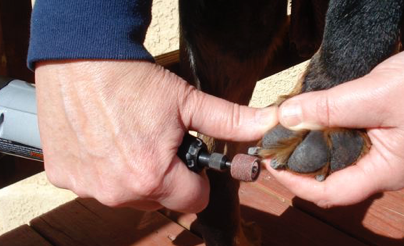
1.DREMEL. I prefer a cordless Dremel with variable speed settings. Attach a sandpaper head. Wearing a dust mask and safety glasses is recommended.
-
2.Quick Stop styptic powder to stop any bleeding from accidental grinding or cutting into the quick.
-
3.Collar and leash to control your dog.
-
4.Dog Treats to reward your dog for their cooperation.
-
5.A grooming table or a post to tie your dog or a friend to hold your dog.
-
6.A cooperative dog.
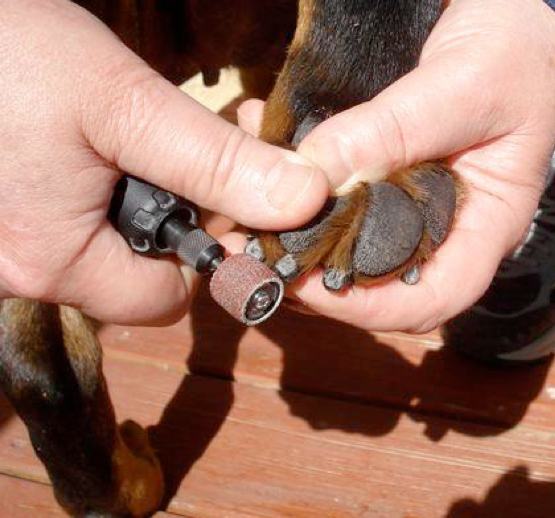
You can stand your dog or have your dog lay down. If you have your dog stand secure your dog in place by asking a friend to hold onto the leash, or if you are by yourself tie your dog to a post and have them stand on the ground or attach their collar to the arm of the grooming table while they stand on the table. A good practice is to start on the rear paw to avoid initially approaching your dog’s face area with the noisy grinder. This allows you to ease into the process from the farthest point away from the dog’s eyes and ears. I grind each toe on each paw four separate times: center, left, right and bottom creating a rounded nail. I work on one side of the dog, back leg first, then front leg. Next, I move to the opposite side of the dog, again starting with the back leg first, then move to the front leg.
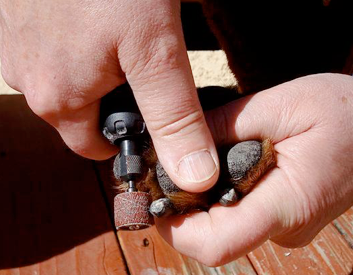
Once I have the dog positioned and secure, I pick up the dog's leg and hold the paw with the pad facing up toward the sky. I hold the paw in my left hand and the grinder in my right hand, because I am right handed. I single out a toe and hold this toe at the pad area between my forefinger and my thumb. Although I use a small amount of pressure on the toe to push the nail out, I do NOT squeeze it. Set the Dremel at 1/2 speed for a adult and about 1/4 to 1/3 speed for a puppy. Hold onto the Dremel high up near the neck just under the rotating head for good balance. On the selected toe, place your right hand thumb (grinder hand) on top of the selected pad. Place the rotating sandpaper head on the selected nail at the top center just above the tip. Move the grinder head in an arcing motion from the top of the nail, over the tip and toward the bottom of the nail. Apply moderate pressure. Move on to the next nail and repeat until you have ground the center of each nail on the selected paw. Next repeat this process by grinding the left side of each nail of each paw in an arcing motion from the side over the bottom edge of the nail. Now repeat this process by grinding the right side of each nail in a arcing motion from the side over the tip and onto the bottom edge of each nail using light pressure. Now that you have ground each nail on this paw three times: Center, Left, Right, check the bottom of each nail and if the black casing of the nail has curled over covering the white sack of the quick or curled up causing a cup grind this lightly with one motion from toe outward toward the tip. I find that by working on one grind on one nail at a time, this prevents the nail from heating up and causing pain to your dog. Save any additional grinding to fix missed spots until you have completed every paw. Remember you can always come back to a nail and take more off, but you can not put the nail back on if you take too much off. Do not linger on a nail which causes heat and discomfort to your dog. The secret is to move along confidently and quickly and not to linger on a nail because that will create heat and pain to your dog.
With smaller dogs or puppies, I find it easier to have my partner hold the dog on their lap with their belly and feet pointed out toward me, or I sit on the ground with my legs spread and place the puppy between my legs on their back and paws sticking up toward the sky. Some people hold them against their side, arm around their body, and underneath to hold the front legs. I find that this may make your puppy struggle to get away, but this gives you more control. I use the Dremel and quickly grind each nail on every paw four times (Center, left, right, bottom), moving along from toe to toe. Remember, you can always come back to take more of the black casing off. Do not linger on a nail which causes the nail to heat up and will hurt your puppy.
Begin by placing the sand paper head on the top side of nail.
Then move the sandpaper head in an arcing motion over the top of the nail and onto the tip of the nail toward the bottom of the nail grinding away the outer nail casing from around the quick.
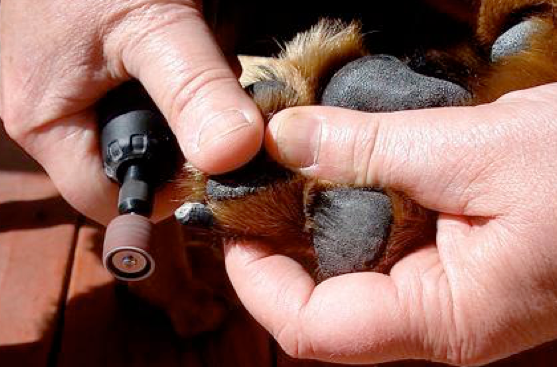
Step 1: First I grind the center of each nail on the selected paw. My motion is an arcing motion from the top over the tip and toward the bottom of the nail.
This arcing grinding motion of the center of the nail creates a flat surface on the front tip of the nail removing the black nail casing exposing the white sack that encases the quick. Notice the nail above that I am grinding becomes flat on the front edge.
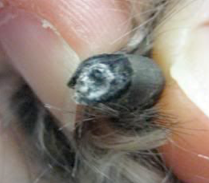
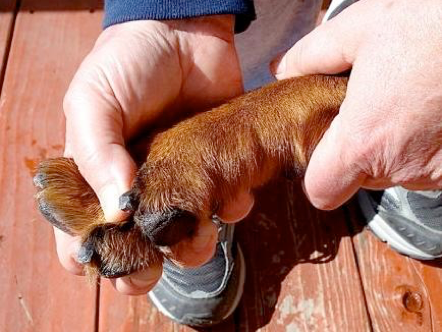
The photo below shows a trimmed nail that was allowed to grow too long.
It shows the white sack surrounding the quick and the black dot in the center is the the quick.
Step 2: Second I grind the left side of each nail on the selected paw. My motion is an arcing motion
from the top over the tip and toward the bottom.
Secondly I grind the outside left side of each nail on the foot that you are working on in an arcing motion from top over the edge toward the bottom shaving away the outer nail casing from around the quick.
Step 3: Third I grind the right side of each nail on each paw. My motion is an arcing motion
from the top over the tip and toward the bottom
ThirdIy grind the outside right side of each nail on the foot that you are working on in an arcing motion from top over the edge toward the bottom shaving away the outer nail casing from around the quick.
Next: Check the bottom of the nails and grind very lightly by moving the grinder across the bottom from the back near the paw toward the tip removing any excess curved nail casing.
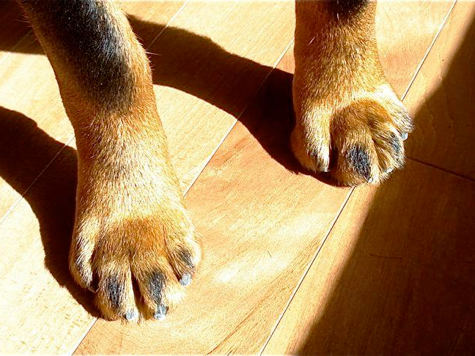
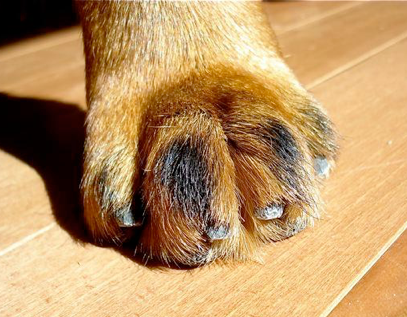
4. Finished nails:
Notice how the nails appear as if I have been widdling a stick or sharpening a pencil with a knife to cut away the front edge of the black nail casing making the nail shorter and removing the protective nail layer away from the quick.
5. Notice the nail does not touch the floor but instead sticks straight out
See the third nail from the left, the quick is exposed facing out like a headlight, not pointing down at the tip.
This is what I mean by working the quick up and back to shorten it.
Reminder: Do not spend a lot of time on each nail trying to get a perfectly round circumference. Just use the three grinds (front center, left and right) per nail method.
If you are confident, calmly firm and move along expediously your dog will be more cooperative with nail grinding.
Make it as pleasant as possible. When finished give your dog a food treat and a reward by playing with him or taking him for a walk.
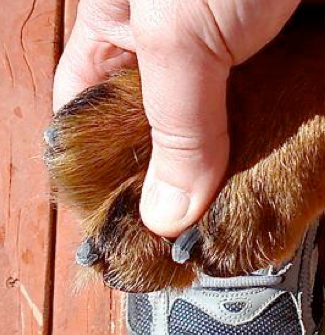
Well groomed nails make for healthy limbs and caw paw feet. These pads, instead of the nails, are allowed to touch and rest on the floor making for a correctly used paw, leg, shoulder and hip joint when walking and trotting for correct body motion in movement. The added bonus is that short nails will not scratch your floors, and your dog will not slip and slide on solid surfaces.


